
There's this pricey little boutique in our neighborhood. You know the kind; the one you stand in front of and look longingly through the window at all the loveliness displayed before you; knowing that there's no way you can afford the $340 sandals winking at you from their lofty perch even if you went without your daily coffee for the next 10 months which, let's get real here, is so not going to happen. I actually bought a couple of things there when I was in the black (eons ago) but now that I'm mostly in the red, it's just window shopping for me.
Yesterday, I decided to go in and browse and my eye was caught by several super cute fabric pom poms here and there throughout the store; attached to a leather clutch, a long chain necklace, pinned to a sweater.
$25! Not kidding.
And of course, my crafty mind immediately said, "I can make this!" and that's what I did as soon as I got home.
Here's what you'll need:
self healing mat
rotary cutter
acryllic ruler
coordinating fabric (2-3)
ribbon, cording, lace for the tie (get creative)
beads (optional)

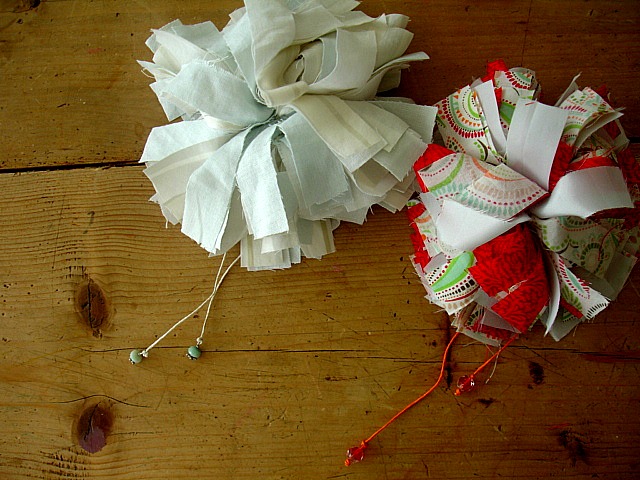
Gather your fabrics together. I went with three but you could use two or even just one depending on what you're thinking to use the pom for. The one's at the store were solid jewel tones - deep red and orange mixed together. Pretty.
Then start cutting. Obviously, I didn't have a tape measure with me so I just guess-timated. The first pom I made had uniform fabric strips of 1" x 7" which turned out big and flouncy and the second was 1" x 6".


I didn't count how many strips I made of each but, obviously, the more you have the fuller your pom. You could even have more of one color and less of others; they'd just be accents. Once everything is cut to your liking, lay them out in the order you want on top of whatever you're going to use to tie your pom together.

Tie it up nice and tight and then just start fluffing it out and twisting and turning until it's just the way you like it. I added beads to the end of my string just to pretty it up and you can use any type of fabric you have on hand from your stash. 7/8" ribbon would be a pretty accent. Not completely sure about burlap even though I have some 1" x 5" strips waiting for me on the counter; I think it might fray too much.


Put one on top of a package, embellish a piece of jewelry, tie it to a belt. Lots of fun possibilities! Oh! I almost forgot. My cost? $0!!!


Isn't it fun to make something you saw in a store that turns out just as cute at a fraction of the cost? Thanks for sharing!
ReplyDeleteit sure is, tanya ~ love when that happens!
ReplyDeleteso simple, so sweet, great job! Thanks for sharing the idea.
ReplyDeletethis is perfect for my new bottle project...
ReplyDeleteWould luv for our readers to discover this.
please add it to our linking party here
http://www.passionatelyartistic.com/2011/06/beautiful-furniture-redo-pop-up-cards.html
Have a great week,
Maggie
http://passionatelyartistic.com
I love projects like that! Making something cute even better, because you didn't pay a ridiculous price for it. Plus: It's self-made! :) Great idea and job!!
ReplyDeleteThank you so much, also, for your sweet comment on my blog!!
xoxo,
Vanessa
Ooooh! These are fabulous!!! Love that you also shared a tutorial! Thanks for sharing at the Tuesday To Do Party! Can't wait to see what you link this week!
ReplyDeleteSmiles!
Jami